
【實戰】Day 24:Mode A 實作:用 Pydantic AI 打造鞋墊廠訂單決策 Agent
從設計圖到真實程式碼。本篇完整實作 Day 20 規格書中的 Mode A 單一決策 Agent:Pydantic AI + FastAPI 五層架構全部串通,並說清楚前後端為何必須分離、API 如何成為唯一橋樑。
WRITTEN BY

- Name
- Harry Chang
💡 數據為虛擬數據,並為了方便演示,毛利率改由品牌決定,而非庫存。
在 Day 20,我們寫了一份系統規格書,畫了漂亮的架構圖,定義了雙模式決策、五層架構。
今天,我們要把它變成真正能跑的程式碼。
本篇是這個系列最重要的一篇實作文章,因為它把前面十幾天談過的所有概念——Pydantic AI、FastAPI、Tool Layer、User Context——第一次同時活在同一個專案裡。
- 先回答一個最常被問的問題
- 整體專案結構
- 完整系統架構圖
- 請求時序圖
- 啟動環境
- 核心實作一:Tool Layer
- 核心實作二:Pydantic AI Agent
- 核心實作三:User Context
- 核心實作四:FastAPI 端點
- 為什麼 main.py 必須先 load_dotenv?
- 呼叫測試
- 實用建議:三個起步行動
- 我的反思
- 參考資料
先回答一個最常被問的問題
「前端 Next.js 和後端 Python,是不是不同的環境?要用 API 接?」
是的。兩套完全獨立的環境,唯一的橋樑是 HTTP API。
┌──────────────────────────────┐     HTTP API      ┌──────────────────────────────┐
│  Frontend (Node.js)          │ ←──────────────→  │  Backend (Python 3.10)       │
│  Next.js + Shadcn            │                   │  FastAPI + Pydantic AI        │
│  port: 3000                  │                   │  port: 8000                   │
│  套件管理:npm / node_modules │                   │  套件管理:pip / venv          │
└──────────────────────────────┘                   └──────────────────────────────┘
這不是「前後端分離」的選擇題,而是現實——最強大的 AI 框架(Pydantic AI、LangGraph、CrewAI)全都在 Python 生態系。前端的 JavaScript 不能直接呼叫它們。
Next.js 的職責是:拿到漂亮的 JSON,畫出漂亮的畫面。
FastAPI 的職責是:接受前端的問題,驅動 AI,把結果回傳成 JSON。
整體專案結構
ERP-AI-Agent/
├── backend/                           ← Python 3.10 venv
│   ├── venv/                          ← 獨立 Python 環境
│   ├── data/                          ← Mock JSON(替代 Oracle ERP)
│   │   ├── orders.json                ← 15 筆訂單
│   │   ├── factories.json             ← 3 廠區
│   │   ├── customers.json             ← 6 客戶
│   │   └── inventory.json             ← 原料庫存
│   ├── app/
│   │   ├── main.py                    ← FastAPI 入口(最先 load_dotenv)
│   │   ├── data_loader.py             ← 讀 JSON 的統一入口
│   │   ├── routers/
│   │   │   ├── orders.py              ← /api/v1/orders(Day 19 的 Business API)
│   │   │   └── agent.py               ← /api/v1/agent/query(今天新增)
│   │   ├── tools/
│   │   │   └── order_tools.py         ← Tool Layer(Day 21,今天真正實作)
│   │   ├── agents/
│   │   │   └── order_agent.py         ← Pydantic AI Agent(今天核心)
│   │   └── context/
│   │       └── user_context.py        ← User Context Layer(Day 22,今天真正實作)
│   ├── .env                           ← API Key(不進 git)
│   └── requirements.txt
└── frontend/
    └── next-shadcn-dashboard-starter-main/   ← Day 23 的 Next.js 模板
完整系統架構圖
這是 Day 18 到今天為止,所有層次的實際對應關係:
請求時序圖
架構圖說明「有哪些層」,時序圖說明「一次請求怎麼走過這些層」:
| 步驟 | 發生什麼事 | 對應技術 |
|---|---|---|
| ① 前後端橋樑 | 前端透過 HTTP POST 發問,跨越 Node.js / Python 環境邊界 | FastAPI CORS + fetch |
| ② UserContext 注入 | FastAPI 取出使用者角色,注入 Agent 的 system_prompt,決定回答重點與格式 | get_agent_deps() → AgentDeps |
| ③ ReAct 工具決策 | Pydantic AI Agent 讀取工具的 Docstring,自主決定呼叫哪個 @tool_plain、傳入什麼參數 | Pydantic AI ReAct loop |
| ④ 資料回傳 | 工具從 JSON 計算結果回傳 dict,Agent 生成自然語言,FastAPI 序列化為 JSON | result.data → AgentResponse |
啟動環境
# 第一次安裝
cd ERP-AI-Agent/backend
py -3.10 -m venv venv
.\venv\Scripts\pip install -r requirements.txt

# 設定 API Key(複製 .env.example → .env,填入真實 key)
cp .env.example .env
# 編輯 .env:OPENAI_API_KEY=sk-你的真實金鑰

# 啟動
.\venv\Scripts\uvicorn app.main:app --reload --port 8000
核心實作一:Tool Layer
app/tools/order_tools.py 是純粹的 Python 函式,不依賴任何 AI 框架。它們只負責從 JSON 撈資料、計算、回傳 dict。
def calculate_gross_margin(brand_name: str) -> dict:
    """
    用途:計算指定品牌的訂單毛利率。
    使用時機:當主管詢問利潤、毛利、賺不賺錢時呼叫。
    回傳:毛利率百分比,並標示是否低於公司紅線 15%。
    """
    orders = [o for o in get_orders() if o["brand_name"].lower() == brand_name.lower()]
    total_revenue = sum(o["total_amount"] for o in orders)
    total_cost = sum(o["unit_price"] * 0.35 * o["order_qty"] for o in orders)
    gross_profit = total_revenue - total_cost
    margin_pct = round(gross_profit / total_revenue * 100, 1)
    return {
        "brand_name": brand_name,
        "gross_margin_pct": margin_pct,
        "below_redline": margin_pct < 15.0,  # 低於紅線要觸發警報
    }
關鍵設計原則:AI 不負責算數學,它只負責決定呼叫哪個函式。 數字計算 100% 在 Python 裡完成,永遠準確。
核心實作二:Pydantic AI Agent
app/agents/order_agent.py 是整個後端的大腦。
from pydantic_ai import Agent
from dataclasses import dataclass

@dataclass
class AgentDeps:
    user_role: str   # "general_manager" | "sales_manager" | "production_manager"
    user_name: str

order_agent = Agent(
    "openai:gpt-4o-mini",
    deps_type=AgentDeps,
    system_prompt=(
        "你是鞋墊廠的專業訂單決策 AI 幕僚,使用繁體中文回答。\n"
        "根據使用者角色給出不同重點:\n"
        "- general_manager:著重毛利率、整體營收,回答簡潔(200字內)。\n"
        "- sales_manager:著重訂單達標率、交期、具體數字,提供行動建議。\n"
        "- production_manager:著重產能稼動率、交期、備料狀況。\n"
        "毛利率 < 15% 必須標示 🚨 低利潤警報。\n"
        "廠區稼動率 > 85% 必須標示 ⚠️ 產能警告。"
    ),
)

@order_agent.tool_plain
def tool_query_orders_by_brand(brand_name: str) -> dict:
    """查詢指定品牌的所有訂單明細、出貨率與總金額。"""
    return query_orders_by_brand(brand_name)

@order_agent.tool_plain
def tool_calculate_gross_margin(brand_name: str) -> dict:
    """計算指定品牌的毛利率,並標示是否低於公司紅線 15%。"""
    return calculate_gross_margin(brand_name)

@order_agent.tool_plain
def tool_get_factory_capacity(factory_code: str) -> dict:
    """查詢廠區產能與稼動率。factory_code: TW-01 / VN-02 / ID-03"""
    return get_factory_capacity(factory_code)

@order_agent.tool_plain
def tool_get_orders_summary() -> dict:
    """取得全廠訂單整體摘要:各品牌營收、各廠出貨量。"""
    return get_orders_summary()
@order_agent.tool_plain 裝飾器做了一件很重要的事:它把函式的 Docstring 轉成 LLM 的工具說明書。LLM 讀 Docstring 決定要呼叫哪個工具、傳入什麼參數——你寫得越清楚,AI 命中率越高。
核心實作三:User Context
# app/context/user_context.py
USER_PROFILES = {
    "gm_harry":    {"name": "Harry", "role": "general_manager"},
    "sales_alice": {"name": "Alice", "role": "sales_manager"},
    "prod_bob":    {"name": "Bob",   "role": "production_manager"},
}

def get_agent_deps(user_id: str) -> AgentDeps:
    profile = USER_PROFILES.get(user_id, DEFAULT_PROFILE)
    return AgentDeps(user_role=profile["role"], user_name=profile["name"])
這個 AgentDeps 會被注入進 Agent 的 System Prompt,讓同一個問題在不同使用者身上產生截然不同的回答——這正是 Day 22 定義的行為。
核心實作四:FastAPI 端點
# app/routers/agent.py
@router.post("/agent/query", response_model=AgentResponse)
async def agent_query(request: AgentRequest):
    deps = get_agent_deps(request.user_id)          # 取 user context
    result = await order_agent.run(request.message, deps=deps)  # 跑 agent
    return AgentResponse(
        reply=result.data,
        user_role=deps.user_role,
        user_name=deps.user_name,
    )
三行有效邏輯:取 context → 跑 agent → 回傳結果。其餘的複雜性,都被封裝在各自的層裡。
為什麼 main.py 必須先 load_dotenv?
# app/main.py ── 順序非常重要
from dotenv import load_dotenv
load_dotenv()  # ← 必須在所有 app 模組 import 之前!

from app.routers import orders, agent  # ← 這行 import 會觸發 Agent 初始化
Pydantic AI 在 Agent(...) 被呼叫的瞬間,就會嘗試初始化 OpenAI client。如果這時 OPENAI_API_KEY 還沒被載入,程式會直接崩潰。load_dotenv() 必須是整個程式的第一行。
呼叫測試
在瀏覽器 http://localhost:8000/docs,可以看到 Swagger UI,進行找 POST /api/v1/agent/query → 點 Try it out → 填入以下內容。
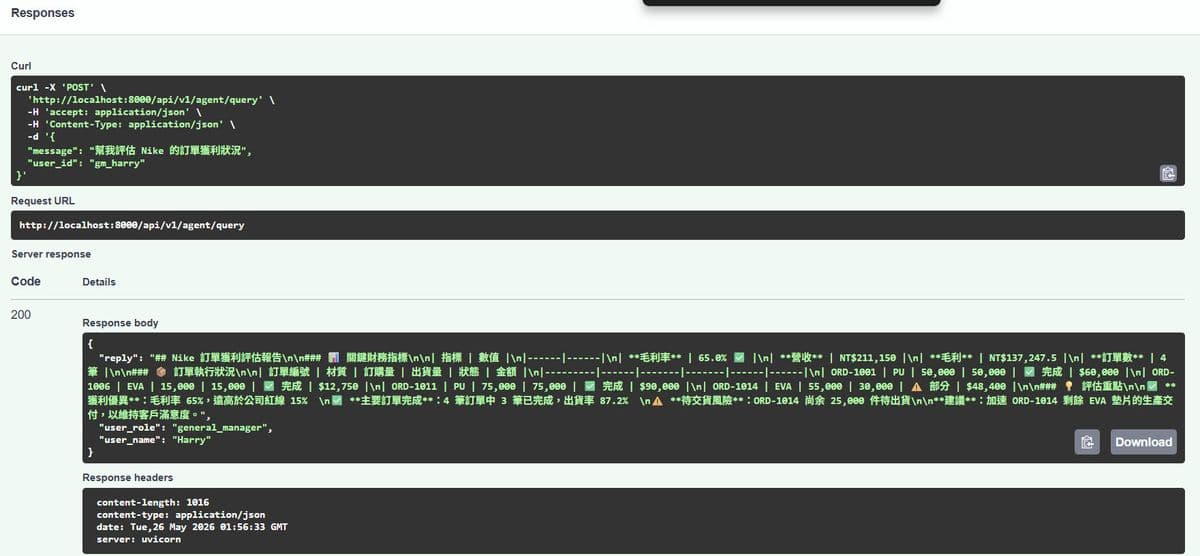
# 總經理視角
curl -X POST http://localhost:8000/api/v1/agent/query \
  -H "Content-Type: application/json" \
  -d '{"message": "幫我評估 Nike 的訂單獲利狀況", "user_id": "gm_harry"}'

# 業務主管視角(同樣的問題,不同角色)
curl -X POST http://localhost:8000/api/v1/agent/query \
  -H "Content-Type: application/json" \
  -d '{"message": "幫我評估 Nike 的訂單獲利狀況", "user_id": "sales_alice"}'
總經理回答(gm_harry):
Nike 訂單財務摘要:
- 總營收:$211,150
- 毛利率:65%(健康,高於 15% 紅線)
- 越南廠 VN-02 稼動率 91% ⚠️ 產能警告,建議謹慎接急單
業務主管回答(sales_alice):
Nike 訂單詳細狀況:
1. 共 4 筆訂單,總量 195,000 雙,出貨率 87%
2. 有 1 筆部分出貨(ORD-1014,55,000雙僅出30,000)
   → 建議確認越南廠交期,主動聯絡客戶說明延遲原因
3. 行動建議:PU 鞋墊佔 64%,可向 Nike 推廣 EVA 材質擴大品項...
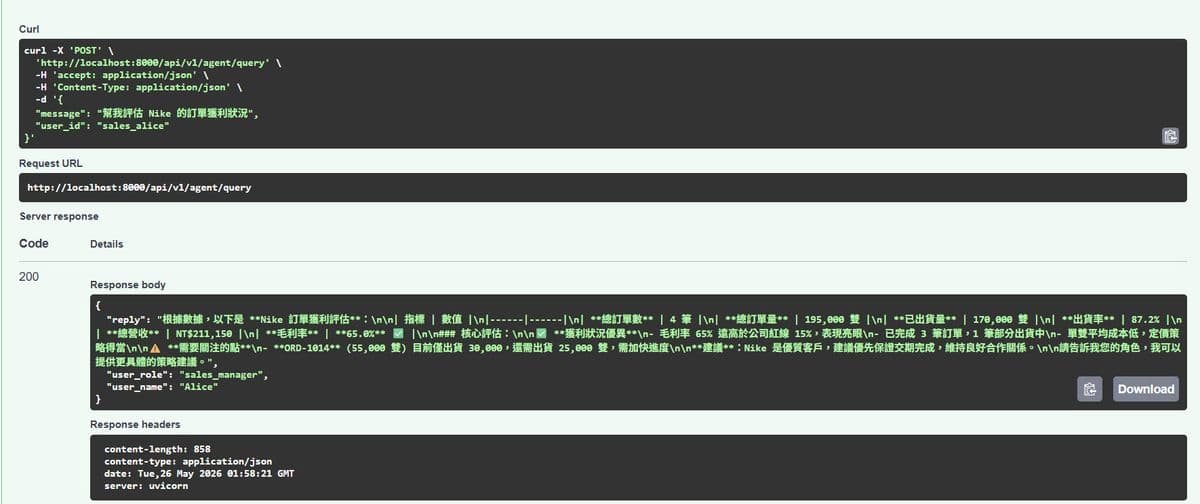
同一個問題,兩個完全不同的回答。這就是 User Context Layer 的實際效果。
實用建議:三個起步行動
步驟 1:把真實 API Key 填進 .env
# .env
OPENAI_API_KEY=sk-你的真實金鑰
LLM_MODEL=openai:gpt-4o-mini  # 便宜、夠用
步驟 2:先測 Tool 函式,再測 Agent
在開 Agent 之前,直接在 Python shell 跑 from app.tools.order_tools import calculate_gross_margin; print(calculate_gross_margin("Nike")),確認工具的計算結果正確。工具對了,Agent 才不會拿到錯誤的資料去分析。
步驟 3:用 curl 或 Swagger UI 測試不同 user_id
FastAPI 自動生成 Swagger UI(http://localhost:8000/docs),在裡面直接測試 user_id = "gm_harry" 和 user_id = "sales_alice" 的差異,感受 Context Layer 的效果。
我的反思
從 Day 18 到今天,我們做了一件很紮實的事:
把六篇文章的設計,真正變成了一個可以跑的系統。
回顧這條路:
| Day | 做了什麼 | 架構層 |
|---|---|---|
| 18 | Oracle → JSON 去識別化 | Layer 5 Data |
| 19 | FastAPI REST API | Layer 4 Business API |
| 20 | 系統規格書、五層架構設計 | 整體藍圖 |
| 21 | Tool Layer 封裝概念 | Layer 3 Tool Layer |
| 22 | User Context 概念 | Layer 2 Context |
| 23 | Next.js Shadcn 前端模板 | Frontend |
| 24(今天) | 全部真正串起來 | Layer 1 AI Agent |
現在後端五層架構全部就位,API 可以接受自然語言提問並回傳決策建議。
下一步:把前端的對話抽屜接上這個 API,讓主管不用開 curl,直接在戰情室裡問問題。
參考資料
官方資源